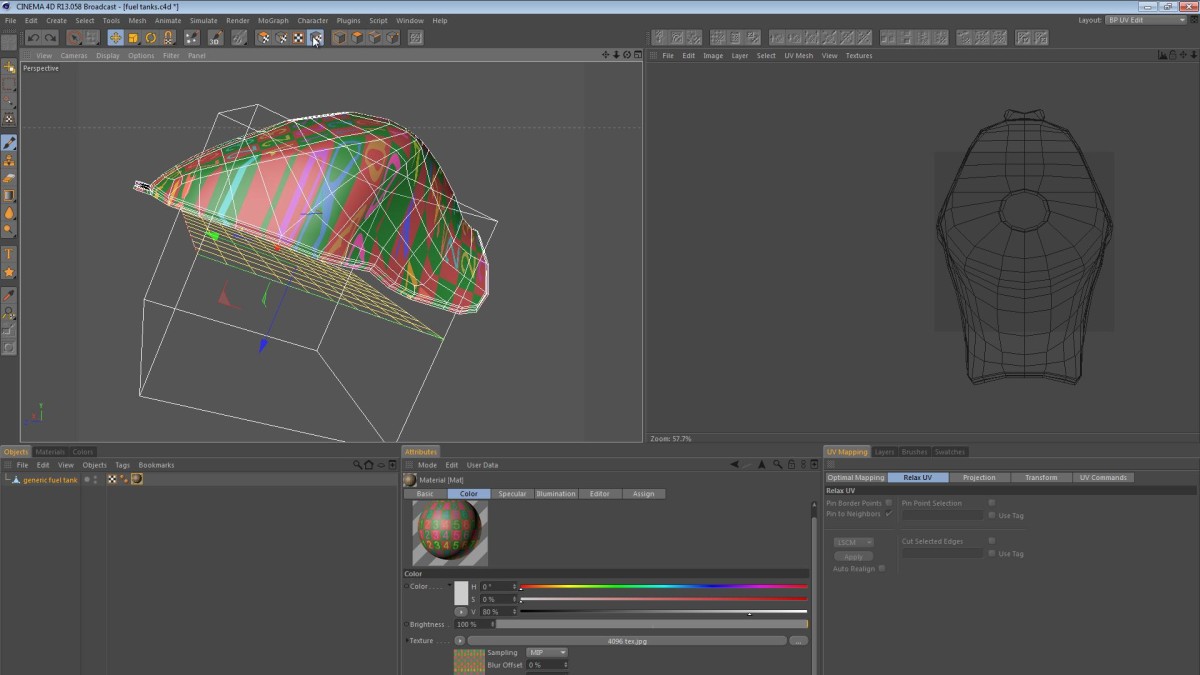
In this video, I walk you through my workflow for UV mapping a fuel tank. It’s a process that’s pretty straightforward, however there are many variations in the technique.
I didn’t just decide to create a UV mapping tutorial about a fuel tank; it was created in response to a question by my friend Mirko who asked about the way I attack this specific challenge. In the video below we look at a few approaches to mapping the tank. First we look at the concept of breaking the tank’s UVs into multiple shells to minimize distortion. We then take a look at what happens if you try to keep the tank as a contiguous mesh. Finally we look at splitting the tank along predefined edges to find a happy medium between the two approaches.
A note about “unwrap” and “relax”:
When recording the video above, I found myself using the words “unwrap” and “relax” interchangeably. This is simply me mixing up the terms and usually when working in the Relax UV panel and I say “unwrap”, I really mean “relax”.
The fuel tank used is actually the tank created for my Generic Sport Bike model on TurboSquid.
evocarti
April 19, 2016 — 2:57 pm
I created a UV from a cylindrical projection (I’m modeling a bottle) but there’s still distortion (the bottle is oval instead of cylindrical). Also I don’t see the polygons show up in the window like your tutorial. What am I doing wrong? Can I send you my file and the image I’m trying to map (you don’t have to do it, just maybe look at it to see what changes need to be made to my UV mapping)
Jamie Hamel-Smith
April 20, 2016 — 11:25 pm
If you don’t see the mesh when you have the object selected, then be sure to use the “UV Polygons” mode. Press Shift-C then type “UV Poly”.
Sonny Black
May 14, 2015 — 6:09 pm
Horrible… use 3dsMax is better
thrdreambuilder
February 15, 2015 — 12:14 am
thanks thanks thanks, you solve my all doubts about mapping
Karl Gruber
February 2, 2015 — 10:18 pm
hey! I´m a beginner.. 31:00 – I was thinking.. wouldn´t the distortion of
the numbers (like the difference in size) be smaller if the polygons of the
tank were more equal in size?
siehmichjetzt
November 15, 2014 — 1:36 pm
Hi Jamie,
great tut, thank you for making the effort of sharing. One question: How do
I switch from regular view to texture view? This is not a standard tab in
my configuration. Thx.
Jamo Taylor
November 7, 2014 — 12:02 pm
You are a genius! Thank you! I’m actually beginning to understand UV
mapping in Cinema…
Eks Chen
September 23, 2014 — 10:31 am
Thank you very much for such a clear tutorial. Really clear ed out for me
how all the pin point and relax works. you are awesome.
Nikolaj Stausbøl
August 14, 2014 — 1:40 pm
Finally! A clean and useful tutorial for a complex shape. Not just a cube.
Not just the easiest solution, but a solution that will work in most cases.
Can’t thank you enough for this! Every single time I’ve had to do UV
mapping I’ve searched for tutorials because it’s never been explained well
to me. Even the ones you can pay for suck compared to this. Finally I have
one I can refer to for anything! 🙂 Thank you
Nikolaj Stausbøl
August 14, 2014 — 6:43 am
Finally! A clean and useful tutorial for a complex shape. Not just a cube. Not just the easiest solution, but a solution that will work in most cases. Can’t thank you enough for this! Every single time I’ve had to do UV mapping I’ve searched for tutorials because it’s never been explained well to me. Even the ones you can pay for suck compared to this. Finally I have one I can refer to for anything! 🙂 Thank you
BenDaleTV
July 30, 2014 — 3:42 pm
Superb, very clear, and I can’t thank you enough.
Heid Laurent
July 9, 2014 — 7:31 am
Fantastic tutorial, keep them coming!