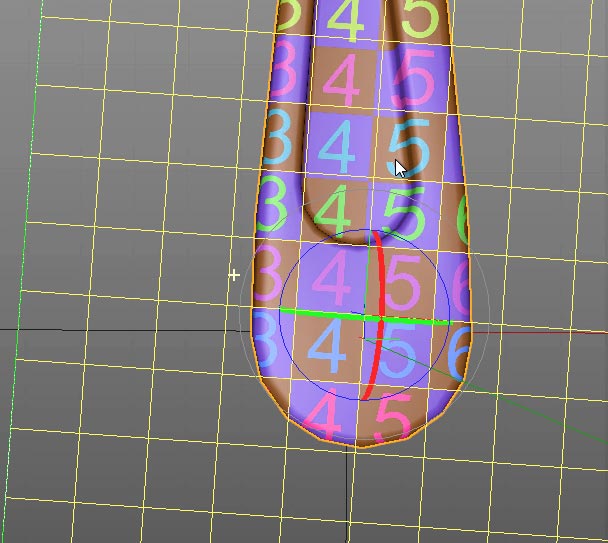
Part two of the UV Mapping series focuses on a practical example of how you would map an irregular object. There’s a bit of discussion about where it’s OK for seams to appear, and why it’s important to keep distortion under control. Of course, we touch on the topic of reducing distortion by creating cuts, moving seams, and breaking apart Islands or Shells.
Fedor ma-ko-e
April 20, 2015 — 9:57 am
Thanx!
robafilm
June 13, 2014 — 9:21 am
Thank’s a lot for this!! It helped me a lot…
Marawan Maher
December 30, 2013 — 12:39 am
Soooooooooooo much complex my friend
Göran Thorén
December 23, 2013 — 8:03 pm
Thank’s for this!
UV mapping in Cinema was a pain before I saw this. Thank you, thank you!
David
June 19, 2013 — 7:19 pm
Thanks for the series of great tutes! I really like that layout you’re using on most of your tutes that combines the standard layout and elements of the bodypaint layout. Seems very direct and efficient and makes for a much quicker workflow. Any chance I could download that from somewhere?
Jamie Hamel-Smith
June 21, 2013 — 7:39 am
I have that layout for R13, but it doesn’t translate very well for R14. Would it be beneficial if I did a video on how to setup your own layouts?
David
June 21, 2013 — 2:01 pm
Yes, that would be great. Your videos are an almost perfect combination of pace and content so a video about your hybrid layout would be very beneficial, I’m sure.
estudiomotovisual
April 25, 2013 — 1:27 am
Great tutorials Jamie. Very informative and easy to follow. Thanks a lot!
Jamie Hamel-Smith
May 1, 2013 — 4:34 am
I’m really glad you like them 🙂
MySonyVegas
April 10, 2013 — 7:59 pm
Great, I learnt a lot, again. The seams – as I see it, one of the purposes og UV mapping is to avoid seems like the pledge, get rid of them..
I will experiment myself, using the techniques you describe. And I have already made myself a test pattern to use. I wonder why other make UV mapping tutors, without such, because the test pattern really clears things up.
Jamie Hamel-Smith
April 15, 2013 — 4:13 am
You know, I don’t remember where I first saw the test pattern, but I’ve seen some software with built-in test patterns. For example, there’s a program called AccuTrans3D (conversion software) and it has a built-in pattern. Either way, I’m glad it works for you! ^.^
gokhan
April 9, 2013 — 1:36 am
Thank you very much my friend,it’s OK now,
so that I can work more comfortable in Photoshop.
I will be waiting new tutorials with patience 😉
Please take care of yourself,bye.
NightHawk Italo
April 8, 2013 — 1:00 pm
Hi my friend,firstly thank you very much for great tutorials,I will follow you and I watched your all videos,these are very useful for me,I hope other fiends are thinking like me.
I have a question about UVW mapping,I hope you can help me;
(I have a little English and I hope I can understand…)
To give a simple example;
I want to create rusted metal cube and I want edit my texture in Photoshop but I need to know where the edges and corners of the cube…
Thank you very much for everything,bye.
Crystal
April 8, 2013 — 10:23 am
Another informative tutorial that taught me a lot. As a beginner, it’s hard to find the right tutorials. Some go to fast, too slow, some say ‘umm’ more than I can handle and some don’t explain things in a relevant way.
Your teaching style is perfect for me! I can’t wait to watch them all!
From a very appreciative fan! Thank you!
BRODZELi Lasha
April 8, 2013 — 7:39 am
thanks
gokhan
April 8, 2013 — 5:58 am
Hi my friend,firstly thank you very much for great tutorials,I will follow you and I watched your all videos,these are very useful for me,I hope other fiends are thinking like me.
I have a question about UVW mapping,I hope you can help me;
(I have a little English and I hope I can understand…)
-How can I export my C4D Texture Map with UVW templates into Adobe Photoshop?
I want that because I want to edit my picture in Photoshop but I need UVW template for editing…is it possible?
To give a simple example;
I w ant to create rusted metal cube..
I want edit my texture in Photoshop but I need to know where the edges and corners of the cube…
Thank you very much for everything,bye.
Jamie Hamel-Smith
April 8, 2013 — 6:27 am
Sure thing! Try this:
Start by creating a new texture to paint on in the material channel you want. This will load the texture file into memory as well. Once that’s done, and the material is applied to the object you’ve mapped then you can go to the texture view and choose: Layer > Create UV Mesh Layer. WHen you save this project and texture, you can then open the file in Photoshop to paint.
By the way, your English is great!