
Here’s a post that is a bit different for this blog. I don’t typically post about photography, but in this case it’s more about image manipulation. Photography is one of my hobbies, and especially panoramic photography. Some of the image straightening techniques explored here can also be used to prepare textures for use in 3D, so it’s still relatively relevant to this blog.
Introduction
I’ve been using a tool called Hugin (I believe it’s pronounced hyoo-gin) since 2007 when I shot one of my first panoramas; the USS Midway here in San Diego. Since capturing that shot, and being amazed at the power of Hugin’s toolchain (more on that later) I’ve used its basic features and the built in wizard to stitch the occasional set of photos. More recently I purchased a fisheye lens for my Micro Four Thirds camera and discovered a whole new set of features that Hugin has to offer.
Before moving on, it’s important to note that Hugin is free, open-source software built by a team of wonderful folks who have created quite possibly; the best panorama stitching and manipulation tool out there. In addition, almost everything I’ve learned about Hugin is documented in the built-in help or the tutorial page on Hugin’s site. Many of the demos and features I’m going to explore were inspired by the tutorials on the aforementioned page.
The Goal of These Videos
This post is a rather long one, and contains a lot of video. My goal is to get you to the point where you can download and install Hugin, stitch your first panorama (I’ve provided some images), and see a few of Hugin’s pixel-bending abilities when it’s used on fisheye photos. If after seeing how easy it can be to stitch photos in Hugin you don’t feel to go out and shoot a collection of photos and try it yourself, then I may have failed.
Overview and Stitching 3 Photos
This first video is an overview of the Hugin user interface, and an example of how to use the alignment and stitching wizard. We start off by stitching three photos of a city street corner, taken with my 20mm (40mm equivalent) lens and Hugin basically does everything for us. Once it’s done, I do my best to explain what Hugin actually did when it ran all of those command-line programs automatically for us.
Here are the source images for this three image stitch: East Village Panorama Images
De-Fishing an Image and Straightening a Pattern
The second video handles a less well known use of Hugin, and it involves loading a single image and distorting it. Hugin has an amazing model for handling lens distortions and can make a fisheye image straight again, or a series of images appear to have originated from a fisheye or ultra wide-angle lens. In addition, we will also look at straightening an image that appears to be straight, but is not.
Here are the source images for the brick wall exercise: Brick Wall Images. You can also try straightening this house using the horizontal and vertical lines technique that we used on the brick wall.
De-Fishing an Image With Different Projections
Hugin can help you straighten and De-Fish images, but in doing so it also allows you to apply different projections to your images. While this feature is likely in existence for panorama mapping, it can create some very cool looking images if used correctly.
Here is the source image for this exercise (and a bonus image): Mural Fisheye
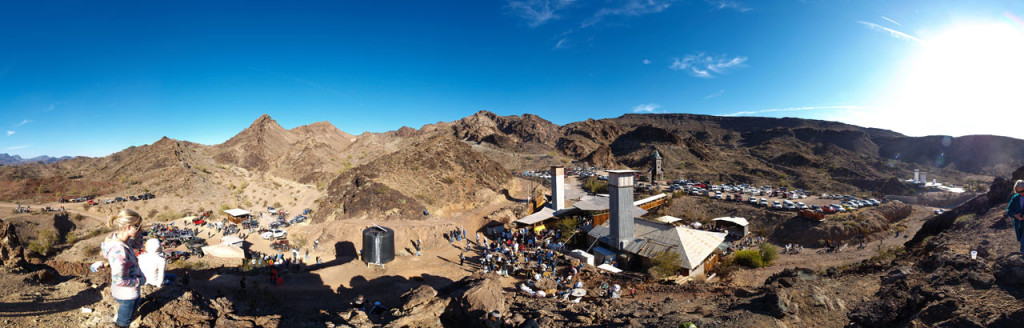
Here are some of the different projections from the last exercise, and the panorama of The Desert Bar in Arizona (created with Hugin).


I plan to create more Hugin tutorials, and I have some challenging ideas lined up. One of my ideas is based on this Hugin tutorial, and I’ve written a story about it on 500px. I’m looking forward to the response from this post, and if you have any feedback for me then please leave a comment and let me know.
matt jones
June 19, 2015 — 2:06 am
Thanks for the great information. I don’t actually like to turn my fisheye
shots rectilinear as it crops so much of the image, however using the other
projections as you described works really well, particularly “Thoby
Projection”.
john doe
January 25, 2015 — 7:45 pm
Thanks jamie for the 3 videos. Just started to play with this wonderful
program :)
KW Chin
November 25, 2014 — 3:09 am
Can Hugin stitch RAW files?
Or only jpg files?
roy seibel
October 19, 2014 — 7:37 am
Excellent! More Tutorials please.
David Farquhar
August 11, 2014 — 9:49 pm
Just watched all your Hugin tutorials, thank you for posting them. The
normal Hugin tutorials are good but seeing and hearing you work through
these is really helpful.
Michael Honsinger
July 18, 2014 — 4:20 am
Awesome; thanks Jamie!
Michael Honsinger
July 18, 2014 — 4:16 am
Yes…very useful Jamie; thank you!
Michael Honsinger
July 18, 2014 — 4:05 am
Thank you Jamie. I can’t afford PtGui at this time so I’m trying Hugin out
& your 2 tutorials are better than anything I’ve come across so far!
Groosome128
May 6, 2014 — 3:26 pm
Hey, I haven’t watched your other 2 videos on Hugin yet so apologies if
it’s covered but I’m wondering how you can tell it not to do anything about
exposure except on the stitch zones. I have a panorama of the night sky
from a beach that looks ok coming out of PTGUI where the colour is close to
the individual images but I wanted to try the interface of Hugin for
straightening the horizon and the very convenient crop feature but it seems
to want to always unecessarily change the exposure/colour of the whole
image to lighter. I can’t work out how to tell it not to try to be too
smart!
Eci hoo
May 4, 2014 — 8:16 am
what the version this hugin.. cause mine not same as like this.
haemse
April 21, 2014 — 1:03 pm
How did you do the zoom of the thumbnails at 1:16 in the file explorer?
radgiegadgie
March 30, 2014 — 8:20 am
Thanks, that was very well explained without going into it too deep. Added
to my favourites under “Hugin tutorial 1”
Thanks for your time, i look forward to trying this out!
MrChilensko
March 18, 2014 — 12:56 am
Thanks,thanks and thanks! these a great video, would please make a video
how to make a 360 panorama with a fish eye lens?
Hugin is not easy to learn
Lewis Francis
March 4, 2014 — 8:28 pm
Thanks much for the very helpful video tutorials — the app is fairly inscrutable to me but your clear examples have helped me make some sense out of Hugin. Thanks again!
Farhad Fatehi
December 22, 2013 — 10:35 am
Thank you Jamie,
I really enjoyed this concise but informative introduction to Hugin.
My problem is stitching photos of a 360 panorama of a square surrounded
with tall buildings including an old church. Hopefully I will find some
more helpful information in your other videos.
Well done!
M Potter
December 6, 2013 — 3:49 pm
Dec 6, 2013 Please add me to your contact. I need to ask you for help with
HUGIN Panorama program. Thanks.
Jocelynne Littlebear
October 27, 2013 — 11:21 pm
Thank you for this most welcome tutorial. I look forward to reading additional materials you may publish on the subject of panoramic photography.
Respectfully,
Jocelynne Littlebear
authoritease
October 25, 2013 — 3:58 pm
Your stitching overview is terrific – super clear. Thanks so much for significantly cutting down the basic Hugin learning-curve.
Jamie Hamel-Smith
October 28, 2013 — 2:29 am
Thanks for the feedback! I’m glad the video was useful to you.
willmon8
June 21, 2013 — 7:43 am
Thanks! That was very helpful. I fumbled through most of it on my own prior to this, but realized after watching this that I didn’t know half of the control point stuff.
Jamie Hamel-Smith
October 28, 2013 — 2:29 am
Yeah, the control point stuff goes really deep. There’s a lot of stuff you can accomplish by manually placing them.