Before diving into this tutorial, I’d like to thank the following posts and their authors:
- Hugin tutorial — Stitching flat scanned images
- Hugin tutorial — Stitching murals using mosaic mode
- Linear Panoramas (Mosaic) Tutorial
- Creating linear panoramas with Hugin
The above posts armed me with the knowledge and techniques needed to go out there and shoot some really cool looking murals, while teaching me what I needed to create the below video.
Even though this example is relatively simple, it’s possible to create mosaic style stitches using different lenses, varying zoom levels, or even different cameras! You can also use as many source images as you’d like, as long as they can all be connected by control points, and some of the images can be used to define the horizontal and vertical lines in the overall composition.
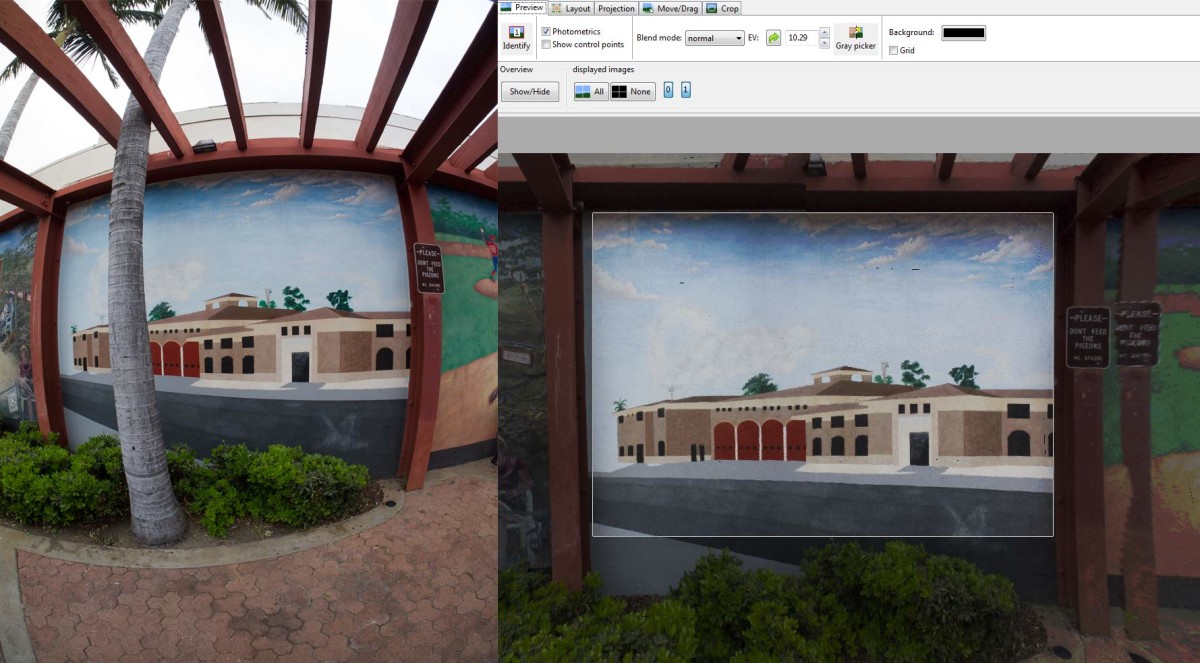
Below is my video on stitching a mural I saw in La Mesa Village near San Diego, California. The mural depicts one of the nearby Fire Stations, and I wanted to see it without the palm tree in front of it. Using the technique originally learned by reading the above tutorial titled: Stitching murals using mosaic mode by Terry Duell, I was able to remove the palm tree using only two different photos of the wall.
Remember when stitching photos in Hugin; always use the full, uncropped versions of the photos. For this tutorial, I’ve included the JPEG versions of the original fisheye images for you to experiment with.
More Complex Flat Stitching
Far more complex stitches are possible with this technique. I recently wrote a story on 500px about how I stitched a much more complex mural and removed the street lamp and traffic control box from in front of it. If you liked this tutorial, please leave a comment and let me know what else you would like to see.
Michael
November 23, 2013 — 8:34 am
Jamie,
WOW! Nice work. Your video is the first that I’ve found that actually walks one through the process. You can see how it’s done. Thank you!
I’m trying to figure out how to use Hugin to create a mosaic that is NOT flat.
Let’s say I want to shoot a row of books in a library. Or perhaps a row of shelves in a grocery store.
I have a few problems.
1, The surface is not flat. Every time I move the camera, even if I remain perfectly flat to the shelves (X,Y,Z) I will still have parallax errors.
2. I have to shoot multiple shots, from multiple locations and stitch them together. Even if I shoot multiple panos and try stitching them together, I still have the parallax problem.
3. Since the rows are tall, I have to shoot the top, middle, and bottom of each row. Now I have to stich vertical as well as horizontal. Even more parallax.
I can’t imagine a much tougher task my first try with Hugin. I guess it would be more difficult if I had to mask out people walking in the pictures.
In any case, I have tried to find someone who might be able to point me in the right direction. Is what I’m trying to do even possible?
If so, where do I start?
I have sample images, that I’m trying to stitch, that I can show you if that would help.
Thanks again for the great video!
Jamie Hamel-Smith
November 24, 2013 — 7:23 pm
You’ve got quite a challenge ahead of you, but I think it can be done.
You’ll need to use Photoshop or some other image editor. I don’t think that Hugin will be able to blend the transitions very well if the mosaic is 3D like a shelf is. Having said that, Hugin should be able to align and straighten the images, but you’ll have to do two things:
I’d suggest checking out Yuval Levy’s tutorial linked from the Hugin tutorials page. He stitches a very long building.
My final piece of advice would be to use a lens wide enough to afford you the ability to shoot only one row of images. Shoot at a height equal to the center of the shelf, that way the distortion is equal at the top and bottom.
It sounds like a really complex stitch, and I’d love to see your progress/the completed piece!
Michael Jackson
November 26, 2013 — 4:07 pm
Jamie,
Thanks for the reply. I’ll definitely try shooting in the center of the row to avoid distortion. I didn’t event think of that with all of the other issues that this problem presents.
Do you have an updated link to the article you wrote on 500PX? I can’t seem to find it by clicking the link above. Does it also have a video component. Your video was excellent.
Thanks for the help!
Jamie Hamel-Smith
November 26, 2013 — 9:40 pm
Unfortunately there’s no video for that mural stitch, but perhaps I can do one in the future. Stay tuned.