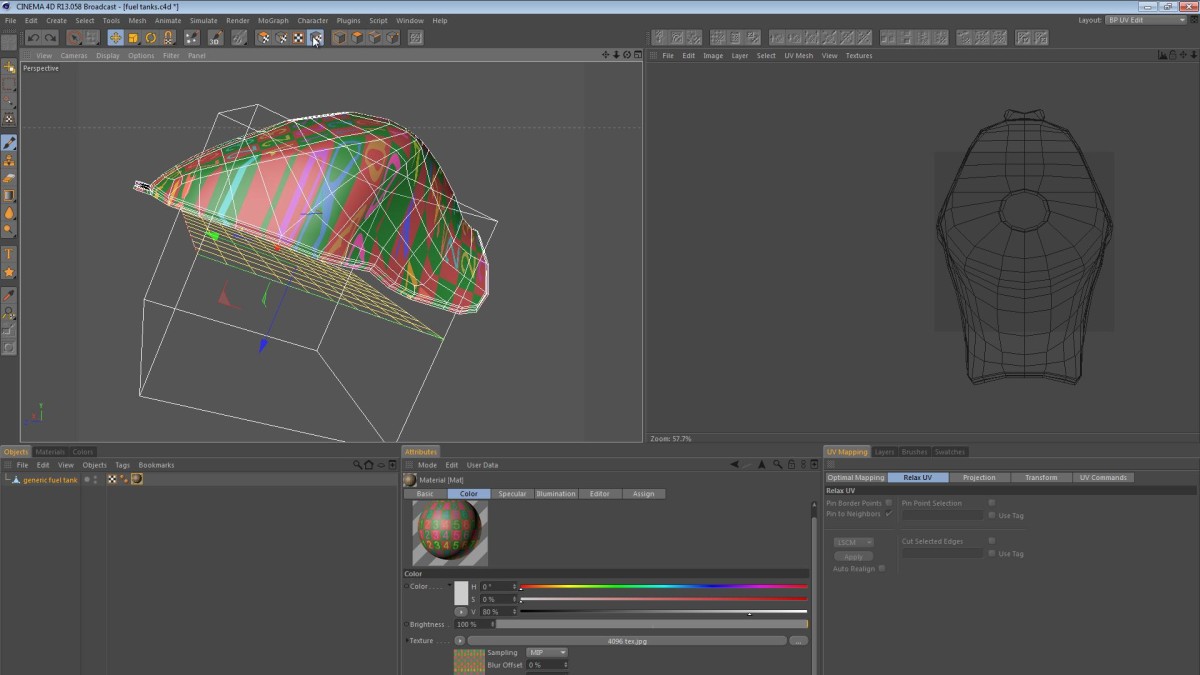
In this video, I walk you through my workflow for UV mapping a fuel tank. It’s a process that’s pretty straightforward, however there are many variations in the technique.
I didn’t just decide to create a UV mapping tutorial about a fuel tank; it was created in response to a question by my friend Mirko who asked about the way I attack this specific challenge. In the video below we look at a few approaches to mapping the tank. First we look at the concept of breaking the tank’s UVs into multiple shells to minimize distortion. We then take a look at what happens if you try to keep the tank as a contiguous mesh. Finally we look at splitting the tank along predefined edges to find a happy medium between the two approaches.
A note about “unwrap” and “relax”:
When recording the video above, I found myself using the words “unwrap” and “relax” interchangeably. This is simply me mixing up the terms and usually when working in the Relax UV panel and I say “unwrap”, I really mean “relax”.
The fuel tank used is actually the tank created for my [turbosquid id=”666315″]Generic Sport Bike model[/turbosquid] on [turbosquid]TurboSquid[/turbosquid].


Kai Sinzinger
July 4, 2014 — 2:37 pm
very practical, as always from your side, whats that checker material, can
you please tell me where to find it or upload?. Thanks, Kai #:)
ECF Hundley
June 15, 2014 — 3:28 pm
Mbv
Thomas Leisner
May 29, 2014 — 3:50 pm
Great! Thanks a lot.
Just because you asked: There is a way to automatically connect UVs. Select
two corresponding rows of UV points and hit the “UV connect” command (on
top of the UV editor in the standard “UV edit” layout).
Another one you might like (and I just learned and am exited about): To
select a whole island of UVs just hold down the “Alt”-Key and click with
either the Live Selection or any of the Transform Tools! :-)
Łukasz Kondek
April 23, 2014 — 7:51 am
Damn Mate, that’s probably the best UV mapping tutorial I’ve ever had the
possibility to watch !!! Thank You 🙂
krille nilzzon
April 13, 2014 — 8:02 pm
this was realy good. can u creat a video u show the best uv for normal? :)
KiwimageArt
February 23, 2014 — 5:29 am
thanks a lot, great tutorial.
knifesk
February 20, 2014 — 1:07 pm
at @16:40 if you select the complete edge of vertices of both seams and use
the “Transform” right beside “UV Commands” with X=0 and Y=1 you’ll stick
all the points toghether in no time
Benjamin McClain
January 27, 2014 — 4:55 am
Absolutely brilliant….learned alot thanks!
Abdeali Achhab
December 22, 2013 — 8:15 am
i worked with other softwares but when you kind of doing uvs for a copmlex
character or object cinema 4d, it seems that c4d has a hude leak in that…
but thx for the tutorial
Jamie Oakley
December 18, 2013 — 3:31 pm
To connect the points or poloys:::Select the poloys, go to UV Commands and
then select UV Terrace.
Maged Afra
December 17, 2013 — 1:40 pm
man, its a gr8 tut, short but strong explanation for a complicated topic
like UVW unwrapping, thank you man
noxrawr
December 8, 2013 — 9:45 pm
By far the best UV mapping vid out there. I have just run into 1 problem.
Once ive made the UV map to my liking,I cant use it when I go into
bodypaint. It seems it requires me to execute the wizard first. What is
your solution to this?
Joel
November 25, 2013 — 11:30 am
Hey Jamie,
I am running into a issue, I have successfully assigned uv coordinates to two places on my model but when I go to do the third and choose flat projection it resets the other coordinates, any idea how to get around this?
Thanks
Jamie Hamel-Smith
November 25, 2013 — 9:41 pm
Be sure that you have a polygon selection when assigning UV coordinates. Also, when you change the mapping to “flat”, you will see flat mapping applied to the whole object until you re-assign UV coordinates or change the mapping back to UVW. In other words, you can’t mix mapping types, and the effect you’re seeing is probably temporary.
muse trial
November 21, 2013 — 10:00 pm
I loved this tutorial. Your skill in teaching is awesome.
Alberto Viana
November 7, 2013 — 1:59 pm
Good Tutorial Thank you
nonny lea
October 17, 2013 — 5:50 pm
(cries like a dog) those numbers look so eerie:(
ArchivePete
September 15, 2013 — 7:17 pm
Excellent tutorial. I am never sure when you can move points, you explain it well. Have just saved this page as a bookmark because I know I will be watching it again over and over.
Thank you.
Alex Spöttel
August 28, 2013 — 2:42 pm
The best UV tutorial for CInema 4D, now I understand what the hell this process is all about. thanks alot!
ap render
July 2, 2013 — 3:22 am
excelente tutorial para mapear modelos complejos
Fuel Tank UV Mapping in Cinema 4D
Germán Sato
June 9, 2013 — 1:59 pm
excelente tutorial para mapear modelos complejos
Fuel Tank UV Mapping in Cinema 4D
lecosechenonso
May 4, 2013 — 4:06 pm
Great tutorial, thanks!
Am I the only one not finding the “use texture axis mode” button anymore on the R14?
Jamie Hamel-Smith
May 4, 2013 — 4:15 pm
This caught me off guard as well. It seems there’s only one texture tool now, but you can switch between axis mode or normal mode by using the axis toggle (the L key). So the L key works in Model Mode, Polygon Mode, Texture Mode, etc.
lecosechenonso
May 4, 2013 — 4:41 pm
Cheers, that helped 🙂
Julian Oczkowski
May 2, 2013 — 3:22 pm
by far the best tut on the subject!
Paul Campbell
May 1, 2013 — 4:46 am
Nice tutorial. Does Cinema 4D have something similar to Live Unwrap shown in this video: vimeo(dot)com/21943368 ?
Jamie Hamel-Smith
May 1, 2013 — 4:48 am
I’m not sure. I don’t think it does.
DesignerLukeFX
April 16, 2013 — 11:53 am
Jack Osbourne, wow your good at Cinema 4D
Jamie Hamel-Smith
May 1, 2013 — 4:30 am
SHARRRRRRRON!
But seriously, assuming this is a comment on my accent then see my “Ducati 999 Rear Tire Tutorial” to see what I sounded like before I moved to the states.
Andrei Guzun
April 12, 2013 — 11:00 am
thank you ,, very interesting tutorial for uv
kesmeby
April 2, 2013 — 4:17 pm
I’ve watched a bunch of C4D UV mapping tutorials on YouTube and this is by far the best one I’ve seen. By the way, when you were snapping the points together manually, it looks like the UV Terrace command will do what you’re looking for there. Just select all the points you want to snap together and hit UV Terrace.
Jamie Hamel-Smith
April 4, 2013 — 3:47 am
Thanks! I’m glad you approve. You are in fact the third person to tell me about the UV Terrace feature. I’ve been mentioning it in my Razorback screencasts since folks taught me the tool. Thanks for the tip! It reminds me of the phrase “Docendo discimus” (by teaching, we learn). I really appreciate all the great feedback ^.^
Noel Wiggins
April 1, 2013 — 7:33 pm
fantastic screen-cast!, thank you so much for taking us on a tour into your workflow, I went from be utterly confused to now being as excited as you to “uncover” my models, I can’t express my gratitude enough
Jamie Hamel-Smith
April 1, 2013 — 7:42 pm
Thanks! I’m glad you found it useful, and I’m always open to sharing my workflows.
1raskumar
March 29, 2013 — 4:55 pm
spasibo
Daniel nardi
March 24, 2013 — 5:17 am
Thank you for this great tut!
I was wondering if you have a good technique to unwrap 3d text in cinema 4D.
I’ve been searching for something like that all over the net and cannot find any..
I know it may seem a simple task compared to unwrapping a 3d complex model, but somehow i cannot do it right…
I figured that if you want to create realistic textures and apply them on text in cinema 4d the normal projection won’t do the job, and the best way to go is UV mapping…
Hope you can enlighten me with your expertise ..:)
Thanks for your help and sharing your knowledge in your tutorials!!
D
Jamie Hamel-Smith
March 24, 2013 — 11:05 am
Hi Daniel,
There’s actually a great Greyscale Gorilla Tutorial on this topic. I don’t think it talks about UV mapping, but there’s some good info in there anyway.
I’ll email you to find out more about what you’re thinking of with the UV mapping technique. Maybe I’ll be able to offer some insight.
Milo Mi
March 16, 2013 — 1:54 am
Thanks Jamie, This was great.
Jamie Hamel-Smith
March 16, 2013 — 2:40 am
I’m really glad you enjoyed it! Thanks for your comment.
sircharlesgraham
March 12, 2013 — 12:12 pm
Absolute class.
Divinxu
March 9, 2013 — 2:16 am
Incredibly helpful. Learned quite a bit. Will have to rewatch it because you are obviously more experienced and i have to look exactly where you click (was not familiar with the v shortcut), but that sure was helpful! Thanks
Jamie Hamel-Smith
March 16, 2013 — 2:39 am
Some of my newer Five Minute Tip videos have keyboard shortcut overlays. You should check those out (a lot of them are very basic however).
catfishy08
February 25, 2013 — 2:12 pm
As a beginner, your tutorial was brilliant – clear, informative and got the job done brilliantly. Thanks for taking the time for this tutorial!
Jamie Hamel-Smith
March 16, 2013 — 2:38 am
I’m so happy to hear that! I’m always trying to get more folks interested in 3D, so I’m a fan of beginners.
Jomatecc
February 18, 2013 — 6:27 am
I avoided UV mapping at all cost until I watched this video, thanks much for the contribution greatly appreciated.
Jamie Hamel-Smith
February 18, 2013 — 9:18 am
No problem! I’m glad you liked it.
bobwalmsley1
January 27, 2013 — 1:51 pm
Excellent tutorial Jamie, Thank you.
In the example fuel tank exercise, how would you export your final maps to photoshop?
Would you use the BodyPaint SetUp Wizard at the beginning of your workflow, or is there a manual way at the end?
Jamie Hamel-Smith
January 27, 2013 — 7:39 pm
There’s a command that can help. Once you create a new texture, and assign it to one of the channels, you can choose: Layer > Create UV Mesh Layer and it will make a layer with the wireframe mesh on it.
Once you’ve done that, you can save the file as a .psd and work on it in Photoshop.
bobwalmsley1
January 28, 2013 — 12:03 pm
That’s great, thanks again for sharing your knowledge.
Alessandro Moreira
January 7, 2013 — 7:26 am
solomanpro
December 30, 2012 — 7:07 pm
Great tutorial! The command you need for stitching the points is UV Terrace under UV Commands. Just select both columns of points and click the button.
Jamie Hamel-Smith
January 1, 2013 — 4:28 am
Thanks for the tip. A few folks have pointed me to that great command since the video was published. Thanks so much for the feedback, and for sharing the info. I love the conversations that these videos can create 🙂
teamformsvacka
December 24, 2012 — 9:08 pm
Thanks Jamie!
This was very helpful, its hard to find good info about this subject.
WaveCG
December 14, 2012 — 10:25 pm
Since you love unwrapping so much maybe I should send you all my meshes and you can go bananas.
Jamie Hamel-Smith
December 20, 2012 — 5:47 am
Nice try, but I’ll pass on that 🙂
stevep67
November 2, 2012 — 3:16 pm
Excellent tut! I do a lot of product (bottles/tubes) mapping, & this is the closest application to that I’ve seen. Thank you.
Jamie Hamel-Smith
November 3, 2012 — 3:17 am
Sweet! I hope it works well for you. Thanks for leaving feedback, it means a lot to me.
halifaxskater
October 30, 2012 — 6:07 pm
Thank you sir, very helpful. Though I was UV mapping a human head, this method easily applied!! Cheers!
Jamie Hamel-Smith
October 31, 2012 — 2:04 am
I’m glad you were able to apply some of the techniques to a human model, awesome!
halifaxskater
October 31, 2012 — 2:08 am
If you’ve ever got time, consider doing a screen cast on UV mapping a human head, I feel like there are many others who could benefit from your proficiency and thorough explanation. There are several head UV mapping video tutorials out there, but many don’t feature explanation. Anyway- Just a thought!
Alejandro Prieto
September 21, 2012 — 3:21 pm
UV Terrace command can do automatically what you try to achieve at 16:00 – 17:00 (joins points and merge groups of UV polys). Great tutorial!
Jamie Hamel-Smith
September 22, 2012 — 3:29 pm
Thanks for this, I never explored that feature. I checked it out and it’s pretty cool.
I’m glad you liked the tutorial too.
Sean O'Skea
August 31, 2012 — 11:13 pm
I’ll subscribe I’ve come to C4D via Vectorworks. My prior modeling has been architectural. VW doesn’t employ UV unwrapping so I’m struggling to learn this new concept, and like I said this tutorial is by far the most clear and comprehensive UV mapping for C4D I’ve found on Youtube. There are one or two others I’ve found but they are only unwrapping a cube or other simple shape. Yours is really terrific. I love your number check texture too—great idea! Thanks.
inlifethrill
August 31, 2012 — 12:17 pm
One of the best tuts on UV mapping I’ve seen so far. Great stuff. Very detailed and very well explained. Few screen casts are of such quality and organization.. both on youtube and vimeo. You should do more of those.
Jamie Hamel-Smith
August 31, 2012 — 1:08 pm
Thanks so much for the feedback, I’m glad you liked the tutorial! I’m always trying to do more tutorials, but time is the limiting factor. Stay tuned!
stchristoph2000
August 28, 2012 — 9:29 pm
fantastic tutorial. I’m subscribing solely based on this video 🙂
Jamie Hamel-Smith
August 29, 2012 — 2:39 am
I’m glad you like it! 🙂
Sean O'Skea
August 5, 2012 — 8:20 am
I couldn’t care less about modeling motercycles, but this is an amazingly informative tutorial on UV mapping–very little on this for C4D on Youtube.
Thank you!
Jamie Hamel-Smith
August 29, 2012 — 2:41 am
I’m glad you like the tutorial, is there another area of UV mapping or Cinema 4D that you’d like a tutorial on? I’m not well versed in character animation or MoGraph, but I like modeling and mapping.
dix9cent84
October 3, 2012 — 12:12 pm
Hi Jamie, can u please make a tutorial on texturing a character in Cinema 4D ? I would like to learn how to do that because I now can model my characters but my texturing are bad. Thanks !
Jamie Hamel-Smith
October 3, 2012 — 2:36 pm
Characters aren’t really my thing, but there are a few good tutorials here on YouTube. Search around and I’m sure you’ll find something that fits.
wexons
July 1, 2012 — 10:07 pm
Thank you
PlatonicStudios3D
May 28, 2012 — 9:09 am
Absolutely Brilliant! I know this is a hard subject to get your head around and this really helps 😀
Mirko
May 21, 2012 — 3:55 am
Thanks so much Jamie. You explain the process so well and provide multiple ways to tackle the task which makes this tutorial so valuable.
It really has helped me understand the process of UV mapping complex objects in so many ways.
My friend you are so kind and I thank you so very much for taking the time to help.
The world is a better place with you in it !
ochristi
May 20, 2012 — 3:28 am
I found UV terrace, no idea if that is doing what you did manually, have
not used c4d for a while. Btw. the link is not working.