
This tip shows a quick, repeatable, and simple technique for placing objects (trees in this case) along an uneven surface in Cinema 4D. Make sure to watch until the end for the caveats involved.

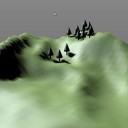
In this video, we look at the challenge ahead of us, and then see how we can solve it with the Cloner object. I don’t go into that approach in detail, but after we see the Cloner’s solution we take a closer look at how we can place the trees with pinpoint precision, making sure they stay on the surface of the terrain.
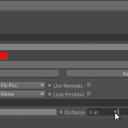
A Note About Alignment and Normals
I neglected to mention that once the object is being constrained to the surface of the landscape, you can set the “Align” option as “Normals” to have each object use the surface normal (or the Phong normal for smoother transitions) as it’s axis alignment. This is not particularly useful for trees (as they all reach for the sky), but it’s very useful for placing rivets or bolts on the curved surface of a vehicle.
jay
March 22, 2018 — 8:24 am
is it possible to use this technique but have the objects move randomly over the surface over a period of frames… like bugs crawling over a surface?
Mimismo
March 15, 2018 — 10:44 am
Great! I got a question about it, ¿What if I want to animate the surface thats holds the constraining objects? If this surface had bones, ¿Is possible the constraining objects follow the movement over the surface?
Sorry if my english is not quite good, XD!
Thanks.
Chris Wedding
August 7, 2017 — 10:31 am
Great tip! Question, is there any way to have it map to an alpha or UV of the surface? I’m trying to randomize something along the surface, but only in specific areas.
Jamie Hamel-Smith
September 20, 2017 — 10:33 am
Not that I am aware of.
bert
March 9, 2016 — 2:53 pm
Thanks. Any chances to align on the geo normals ?
bert
March 9, 2016 — 2:54 pm
A bit like this but automated… https://vimeo.com/70876794
Giuseppe
February 15, 2016 — 9:10 am
many thank
Giuseppe
Perceptive Monkey
October 8, 2015 — 8:14 am
Perfect – thank you!
jaydekaytv
April 9, 2015 — 10:47 pm
Terrific.
mohammed omran
April 2, 2015 — 10:34 pm
Thanks man !!
Paul Postma
March 3, 2015 — 1:44 am
Thank you! Very useful
Trevor Gilchrist
March 2, 2015 — 6:23 pm
Thanks for this insight. Do you think it would be possible to use this
technique to place a label on a bottle and move it around the outre glass
surface? Naturally, I’m going to try it, but wondered if you knew or had
suggestions. The bottle inquestion has complex curves, rather than just
cylindrical sides.. Many thanks
sean siegler
October 20, 2014 — 6:42 am
That is awesome Jamie! I had no idea how to do that. Thanks for the
powerful simple tip!
Elisabeth Clemens
August 31, 2014 — 4:19 pm
Very, very usefull tip! Thank’s a lot for sharing!!
STaSHZILLA420
March 6, 2014 — 6:33 am
That is very neat, however, couldn’t you also use your tree in the hair
mode as well? Using the instance tab in the Hairs options, it should allow
you to use this. From there you would have access to scale, density, and
even have dynamics built in for a cool effect.
Steve
January 1, 2014 — 9:42 am
I’m trying to map icons to the faces of dice. Whats the easiest way to have the icons snap to each face of each die, rotation and all? Thanks!
Benjamin
December 17, 2013 — 11:57 am
Thanks Jamie! Great tip! Especially the locking checkbox.
Benjamin
December 17, 2013 — 12:04 pm
also… Align [ Y+ ] As [ Normal ] let me orient a tiny sphere properly on the surface of a larger sphere. Cheers!
Jamie Hamel-Smith
December 22, 2013 — 8:08 pm
I’m really glad the tip was helpful!
creativex12
September 21, 2013 — 4:14 pm
Very thanks for the tip Jamie !
Tamás Kalanovics
August 15, 2013 — 2:26 pm
This was helpful. Thanks a lot!
Dan Conrad
August 5, 2013 — 12:20 am
Great tip Jamie. Good explanation.
journews
August 3, 2013 — 5:17 pm
2:13 is start
Cory Pelligreno
June 12, 2013 — 1:14 am
great video, thanks!
michaeladeyeye
June 1, 2013 — 12:21 pm
GREAT!!! Please do more on the others specially Spring and mirror
journews
March 29, 2013 — 7:45 pm
Спасибо
frankiedl
January 15, 2013 — 8:04 pm
You just saved my life! had to place gems on jewelry and it worked soooo fine!
Jamie Hamel-Smith
January 15, 2013 — 8:41 pm
That’s great! I’m really glad it made your work a bit easier.
Anthony Skellern
December 18, 2012 — 10:47 am
Amazing – this is a fantastically useful tip.
I just wish I had known about it a while ago, when I had to model the sesame seeds on a burger bun – took me days!
Thanks, Jamie!
Jamie Hamel-Smith
December 18, 2012 — 11:24 am
That’s actually a great use-case. I’m glad you liked the technique and I truly hope you get to use it in the future. You may have even been able to use some MoGraph stuff for the sesame seeds. Maybe I will look into that as another tutorial in the future. Thanks for watching/reading!
hemoglobbin
December 6, 2012 — 3:10 am
One of the best explained tutorials I’ve seen so far.
You talk like an angel, all tutorials should have your voice! 🙂
Usselino
December 3, 2012 — 7:42 pm
cool! thx!
Joey44J
November 19, 2012 — 11:16 pm
Sorry about the irrelevance i just saw that you where good at c4d and would have helped me. and love the videos keep em coming i really needed some of them.
julian field
November 19, 2012 — 7:03 am
Another useful one – thanks for sharing!
flashgiz1
November 18, 2012 — 8:15 pm
Great tip Thanks!
Jan vd Toorn
November 18, 2012 — 7:51 pm
I must say you are by far the best explainer (if that’s a real term) on the net! with Chris Schmidt from GSG he’s also realy good! Keep it up please love your help!
Jamie Hamel-Smith
November 18, 2012 — 8:56 pm
Thanks for the compliment Jan! I’m glad you’re enjoying the tips.
NightHawkItalo
November 16, 2012 — 11:31 am
great tutorial,thank you very much for share my friend 🙂
Joey44J
November 16, 2012 — 2:20 am
Is there any way to delete the isides of a model? lets say I have a box half way into another larger box is there any way to delete the parts in the middle. only reason I ask is when I put the model into blender to make a proper UV map I need, I get all that stupid stuff in the middle witch i don’t want.
Jamie Hamel-Smith
November 18, 2012 — 5:17 am
That’s not really relevant to this video, but I’ll try to help anyway.
It sounds like you need to combine the objects with a Boolean or simply clean up and delete the geometry that’s inside of the object. I was never really able to get into Blender, so I can’t give you specifics.
CheesyEZ
January 9, 2013 — 7:46 am
can you show me how to make a my 3d rigged character pick up a weapon such as a gun and then walk around with it in his hand and then put it down? Plz help! im using c4d r14
Jamie Hamel-Smith
January 9, 2013 — 2:15 pm
I’m sorry, but I’m not the right person to instruct you on that sort of 3D stuff. Character animation is pretty complex and I’ve stayed away from it for the most part. Have you considered using some freely available motion capture data?